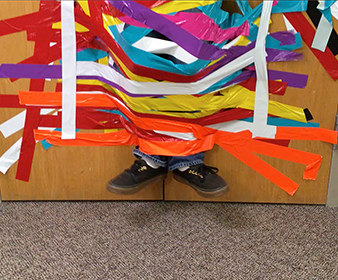
How To Do a PTO Duct Tape Fundraiser

Everything you need to hold this fun and popular fundraiser: step-by-step video, detailed instructions and photos, and more.
A duct tape fundraiser is a great way to build a sense of community—the kids will be beyond excited—and it’s a fun way to raise money for your group. We’ve heard of many parent groups duct-taping the school principal to the wall. There’s something particularly joyful to the students to see that the principal, who can appear remote or even stern, has a fun side and is willing to do something extremely silly. The duct-taping can be the fundraiser itself, with groups charging a small fee, say $1 per strip of tape, for students to participate. Duct-taping works as a great fundraiser incentive, as well: The idea there is that the principal promises to be duct-taped to the wall if the school reaches a certain fundraising goal.
As this fun idea has gained momentum, we decided to do our own “field research” to offer you our best tips to help you duct-tape the principal (or alternatively, duct-tape a teacher). Start by watching our quick, step-by-step video:
Here's what we learned:
Get Your Supplies

-
Plan a shopping trip to get your supplies. We went to a local hardware store to purchase large and small rolls of duct tape and disposable painter’s overalls. We spent about $80.
-
Buy more duct tape than you think you’ll need. Initially, we thought we’d need just a few rolls. But we ended up purchasing three large duct tape rolls and six smaller rolls of neon colors (to add pizazz). It’s better to have extra on hand. One reason: Duct tape is very sticky and a strip of tape can easily get knotted up, sticking to itself and becoming unusable. We lost several pieces that way.
Prep the Area

-
Test the wall surface to make sure the tape will adhere to it. We tested the tape on unpainted concrete walls on the outside of our building and it didn’t stick. From what we see, it looks like most groups do the duct-taping in a school gym or hallway with painted concrete walls.
-
Have a sturdy footstool for your duct-tape volunteer and test it to make sure the stool is comfortable (you don’t want his feet hanging off it), will hold his weight, and can be positioned close to the wall.
Prep Your Volunteer

-
Make sure the person is fully covered with either casual clothes (long sleeves and pants) or a painter’s jumpsuit.
-
Keep in mind that the person will be covered in tape and might get warm. It may help to have a fan set up near your volunteer. Also, have a few bottles of water set aside and be prepared to help him take some sips!
<
Prep the Tape

-
We recommend cutting at least a few dozen strips of tape ahead of time. You can line them up along a table or other surface. If you have pieces ready to go, you’ll avoid a log jam of participants.
-
Cut tape in different lengths. Really long strips (up to 6 feet long) are good for the initial taping. They’ll help secure the person to the wall. We did an “X” formation across our volunteer’s body with long strips, starting to the left and right of his head, crossing over his body, and ending to the left or right of his feet.
-
We used shorter pieces (about 3 feet long) to go across the body horizontally.
-
Use sturdy scissors and have a few back-up pairs. We broke a pair of office scissors (designed to cut paper) when cutting through the duct tape.
Wrap It Up

-
Allow at least 15 minutes to apply tape. (It took us about 20 minutes to do this, with several people cutting strips of tape.) Once you’ve completely covered your volunteer in a few layers of tape, do a quick test to see if the tape will hold him to the wall. We did this by having two people, one on each side, hold the person to the wall while a third person slowly pulled out the stool. The first time we did that, it was quickly apparent that we didn’t have enough tape to secure our volunteer. So, we slid the stool back and did more taping!
-
Once you slide the stool away and the person is clearly held to the wall, ask him to wiggle his feet as a nice show for the students!
-
For safety, we had one person stand on each side of the volunteer as he maneuvered to come off the wall. We helped peel the tape as he pushed forward. The tape peeled off as one giant piece, which resembled a suit or costume!
A Note About Fundraising
-
It usually works best to ask the principal to be your duct-tape volunteer so the entire school can be involved.
-
Set a per-piece price for the fundraiser of $1 or whatever you think will work for your school.
-
As with other fundraising efforts, plan to promote it heavily and let your community know what you will do with the funds raised. Download our duct-tape the principal flyer to help you promote your event.
You can also save it on Pinterest with this image:


Still have questions about how to do a duct-tape fundraiser? Post in the article comments below and one of our experts will jump in.
Originally published in 2013 and updated regularly


